
It’s been a while since I’ve posted a DIY for my new room, which is thankfully getting close to being complete. So as I was making a tree the other day I thought it would be a good subject.
Step 1 – Find something for the base, or trunk of the tree.
For this tree I was lucky enough to find a cardboard tube that was the perfect size. Think the tube inside your roll of paper towels but something that a roll of carpet is wrapped around. I did not get a picture of the tube I used before I started because I’m a dork, but you get the idea. You can also find PVC pipe that is about the perfect size around but that will make your tree much heavier. It’ll also be sturdier, however the cardboard tubing is remarkably sturdy. You may also be able to find this cardboard tubing for sale as a cement pole form at your local hardware store.
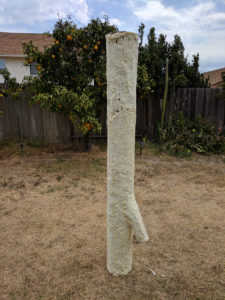
I didn’t really need branches for this tree, which I’ll explain later why that was the case, but I did go ahead and put on one small, stubby branch. I did that using a small piece of wire construction mesh and a staple gun.
Step 2 – Cover the base trunk with foam
You can find various types of canned, spray foam at your local hardware store. It may be called Crack & Gap filler, or something along those lines. I haven’t noticed a lot of difference in the various types so I just get the cheapest stuff they have.

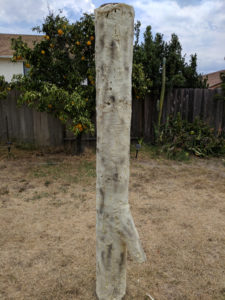
Use a vertical pattern as you spray the foam on, moving the applicator up and down in 2 or 3 foot lines. It should look something like this.
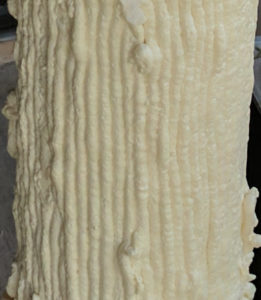
Note that this foam is dried which means it has expanded significantly from when it is put on. You’ll figure out with some practice how much is necessary but don’t be afraid to leave small gaps when applying the foam as it will expand to fill them.
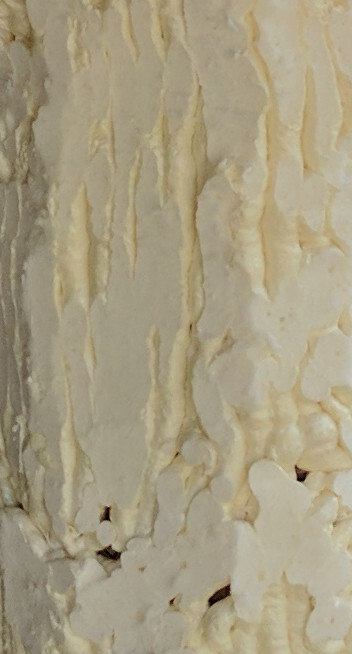
Step 4 – Carve the roundness out of the vertical lines of foam
Wait for the foam to dry completely. It will be dry to the touch relatively quickly, however the inside will still be gooey and sticky so be sure and let it dry for several hours if not overnight.
For carving the foam I found a bread knife works well for this. Since I’m going for the look of tree bark it doesn’t need to be smooth and perfect, but rather rough and uneven, so a serrated bread knife works well. Be sure and always cut AWAY from you so if the knife slips you don’t cut yourself. Wearing protective gloves is always a good idea.
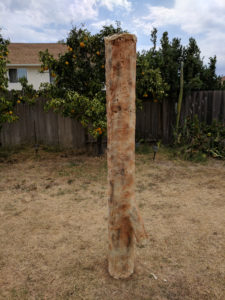
I cut from high to low, straight down the side of the tree, and really try to cut a very thin slice, just enough to cut off the roundness of each line of foam. If you cut too deep you’ll end up with a smooth, even surface as you can see in portions of the image below.
By carving off just a very thin layer you don’t get all the way down to where the foam has totally fused together and you end up with nice, bark-like crevices as you can see below.

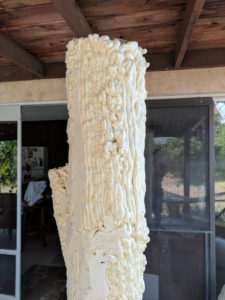
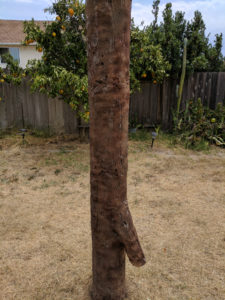
Carve the entire tree and you end up with something like this.
Step 5 – Paint the tree
Painting should be applied to the tree in layers in order to achieve a more realistic look. I used 4 different colors. Well actually 5, the 5th being black, which isn’t shown here.
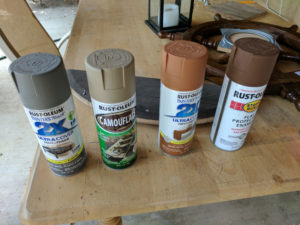
The first color used was the base, grey. In fact it wasn’t so much as base as just random patches of grey.
Next I used the brighter, brown color. I think it was called cinnamon. For this layer I used a bit more than the grey but as you can clearly see there is still a long way to go before the foam is completely covered.
Next I used the dark brown and put on a fairly good covering of the color. This will be the major color of the tree. Be sure and NOT cover everything as you want the base you’ve put on to show through. Hold the can 8 inches or so away so you just get a light mist over everything.
I forgot to get a picture of that so the next step is to put some darker color, like black, or the original grey, in splotches all over the tree.
I then took the camo color and sprayed it into the crevices and deeper sections of the bark. I then returned to the dark brown color and put another misting coat over the tree, trying to smooth out the black/grey splotches.
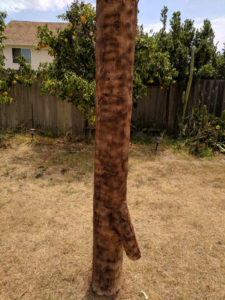
Step 6 – Install the tree
You may have noticed that my tree is upside down, it was just easier to work with that way. You’ll also notice I don’t really have any branches other than that one stumpy branch. The reason is that this tree will be installed from floor to ceiling. I will then hang weeping willow type strands of leaves from the ceiling coming off in various directions to give the illusion that there are branches extending above where we can see.
I’ll put a picture of that once the tree is installed.
I hope you learned something new and useful today.
Come back to see more from my seemingly endless build of The Bayou escape room.